Setting up a Chinese IP camera. Review of high-quality and inexpensive IP cameras for the home The best outdoor video surveillance cameras from AliExpress
Today in the video surveillance industry there is a trend of gradual transition from analog cameras to modern digital IP video capture devices. This fact is quite natural, since analog devices do not keep up with the development of modern technologies, when they offer the user much better image quality and ease of use of the video surveillance system as a whole for virtually the same amount. Plus, with the help of the latter, it is quite easy to organize remote control of an object, which in our time is also becoming an important point when creating a video surveillance system.
In connection with the widespread transition to IP cameras, more and more people began to be interested in the question of their correct connection and configuration. Of course, for a novice user this may seem like a difficult and insoluble task, but for those who have been familiar with computers for a long time, connecting and setting up IP cameras will not cause any particular difficulties. In this article, we tried to describe in as much detail as possible the process of connecting a digital IP camera to a computer, as well as setting the correct settings for the correct operation of the device.
Connecting the IP camera to the computer
Any IP camera connects directly to the computer's network card via. If there are several cameras, then to access the image from each of them you need to connect the IP cameras via a router.All IP cameras have their own address by default, and before we start setting up the IP camera, we need to know it. To do this, you can use specialized software, which usually comes with devices, or download the necessary utility from the manufacturer’s website. In addition, the IP address of the camera is usually written in the user manual or on the device’s label.
If you try to access the camera interface through a browser the first time you connect, you will probably fail. This happens because the computer and the camera are configured to work on different subnets. After we have found out the IP address of the camera, we need to bring it into line with the one used on your local network.
Today, the creation of remote video surveillance is especially important. Surveillance via the Internet is quite easy to carry out using a router with a dedicated IP address. Online video surveillance can be implemented in 4 ways, which you can read about.
Creating remote video surveillance is becoming more and more accessible with the help of special ones. Moreover, when implementing cloud video surveillance, you do not need a dedicated IP address, and equipment settings are kept to a minimum.
For video surveillance at remote sites, GSM cameras may be useful to you. They will be convenient to use at the dacha, in the garage, or in a country house, because they can quickly warn you about the occurrence of various extraordinary events at the site by sending a message to your mobile phone. You can read about GSM cameras for video surveillance using this link.
To find out the IP of the local network, you need to go to the “Sharing and Network Control Center”, then in the “Connections” line, select “Ethernet” or “Via Local Network”. In the window that opens, click on the “Details” button, then a new tab opens, where we find out the IP address of the local network - look at the line “Default gateway IPv4”, in our case the computer works on the network 192.168.99.*. Let's say the IP address of your camera was something like this: 192.168.0.24, now our task is to replace it with 192.168.99.24 - for you it can be any other numbers, but the principle remains the same.

Find out the IP address of the local network
You can change the IP address of the camera using the same program through which you found it out. Hikvision, for example, calls it SADP; other cameras come with their own programs. After the IP address of the camera is brought into line with the address of the local network, the image from it will become available at the new IP address, in our case it is http://192.168.99.24.
Changing the camera's IP address via its web interface
There is another way to get into the camera’s web interface, which involves changing the IP address of the local network. For example, the IP address of our camera is 192.168.0.24, and the local network of the computer is 192.168.99.22, but we need the computer and the camera to work in the same subnet (.99. or.0.). To do this, let’s bring the local network subnet in line with the camera address, for example, change it to 192.168.0.22. To do this, go to the “Sharing and Network Center”, then in the “Connections” line, select the “Ethernet” or “Via Local Network” item. A window should appear, as in the screenshot below. In this window, click on the “Properties” button, then select “IP Protocol version 4 IPv4”, call up its properties, and manually enter the IP address 192.168.0.22, and specify the address of our IP camera 192.168.0.24 as the gateway. Don't forget to save the settings.

Registering an IP address to access the camera. The picture is available for enlargement
Now, through any browser, go to the device’s web interface - enter the camera address 192.168.0.24 in the search bar. If you did everything correctly, a window should open to enter your username and password, which we take from the camera instructions. Usually by default they are admin/admin, admin/12345, admin/00000000, and other easy combinations. After entering the data, you will be able to view the image from the camera, as well as configure the camera.
In the camera's web interface, you need to match the camera's IP address with the local network address. Typically these settings are located on a tab called “Network”. For example, your router is located at the local network address 192.168.99.22, which means that for the camera we need to set an IP something like this: 192.168.99.24. We put a tick in the IP settings for “Fixed IP address” - we will need it to configure it, and enter the data:
- IP address: 192.168.99.24;
- Subnet mask: standard 255.255.255.0;
- Gateway (IP address where our router is located): 192.168.99.22;
- DNS IP Address: 192.168.99.22.
If you do not want to view your cameras via the Internet, then simply check the box next to the Dynamic IP (DCHP) line.
Now you need to assign a port to your camera. By default, port “80” is open, so if your camera does not have such settings, you must use it. If this line is available, we enter the values manually for each camera. For the first, for example, we will set port 8081.

Scheme for connecting IP cameras to a computer via a router and creating access via the Internet
Save the settings, disconnect the camera’s network cable from the computer and insert it into a free port on the router. After this, we reset all the manual IP address settings that we previously made on the local network to connect to the camera’s web interface to automatic - we simply check the dots for obtaining the IP address and DNS addresses automatically, and connect the router to the computer’s network card. If necessary, log into the camera’s web interface through the router using the IP address assigned to it ( http://192.168.99.24), and set up a wireless connection via Wi-Fi. We make the same settings for each camera, and do not forget to assign different IP addresses and ports to all other devices, if this is permissible (on some cameras there is no provision for manually setting ports, for them it will be standard - “80”). For example, we will assign IP 192.168.99.25 to the second camera and port 8082, the third 192.168.99.26/8083, the fourth 192.168.99.27/8084, and so on.
For video surveillance using IP cameras via a computer, you may need special programs. They can be included with the equipment or downloaded separately from the Internet. You can read about them at.
In some cases, it is more appropriate to use IP cameras instead of IP cameras. For example, when a video surveillance system consists of only one camera.
You can organize video surveillance at your dacha using a regular 3G router and several IP cameras. At the same time, it is very important that there are no interruptions in the cellular network signal in your area. Read the article about how to implement country video surveillance using this method.
Setting up a router to view IP cameras via the Internet
After setting up the cameras, it’s the router’s turn:
- We connect all configured cameras to the router via LAN network ports, or via Wi-Fi;
- We connect the router to the computer via Wi-Fi or a network cable;
- We go to its web interface and begin port forwarding so that the router, when accessing a specific address from the outside, knows which camera to issue from the internal network.
These settings can be located in sections called “Port Forwarding”, “Routing”, “WAN”, in the “Virtual Server” or “Virtual Server” tab. First, you need to check the box to activate the virtual server. Depending on the router model, you may come across similar settings:
- Service name - enter manually, for example, “First camera”;
- Port range - the port that we assigned in the settings of the first camera (8081);
- Local IP address (IP camera address) - for example, we have it 192.168.99.24;
- Local port - 8081, or 80 if the camera does not have port settings;
- Protocol: TCP – the IP camera works with this protocol;
- Protocol number: leave the field empty, or write any number, for example, 1.

Connecting and setting up an IP camera via a router
We prescribe the settings for each camera according to the above principle. Do not forget that each camera must have its own different IP address and port, if, of course, there is such a possibility.
To be able to connect to the cameras from any device with Internet access, you will need a static IP address. You can order it from your provider for a fee, or use the DynDNS service. Using this service, you can assign any domain name to your dynamic IP address, like http://your_unique_domain.ddns.ru. But first you need to activate this function in the router settings. In some routers, these settings are located in the “WAN” section on the “DDNS” tab. There you can specify the server (DynDNS, ASUS, NO-IP, etc.), your 3rd level domain name, and other necessary settings. Next, we register the domain name on the service (by the way, ASUS routers have their own free service for these needs), and register it in the router settings.
Checking functionality after setting up IP cameras
After setting up the IP cameras and router, let’s check their functionality. To do this, you need to open your browser and write the IP address of the camera and its port in the address bar in the following form: http://your_unique_domain.ddns.ru:8081, or http://your_static_IP_address:8081. When accessing the camera from your computer located on the same local network as the camera with a router, simply enter its unique IP address into the address bar.
If you have configured everything correctly, the system should work, and when you enter different ports in the address bar of the browser, you will see a picture from the corresponding camera.
So, we have looked at the question of how to connect an IP camera to a computer and configure it to work on a local network, as well as organize access to it via the Internet from any device. Remember that some nuances may vary on equipment from different manufacturers, but the basic principle of setup will always be the same.
With this they read:
Did you like the article? Share with friends on social networks!21 comments
Hello, of course, you can connect any, even the cheapest, IP camera to your laptop. Everything you described will be enough to connect one IP camera to a laptop.
Are there IP cameras with wifi and the ability to directly connect to it without using a wifi router?
Those. I have a phone with Android and wifi, I have an IP camera with wifi in an open field 😉 how to make them friends?Try using tinyCam Monitor to connect security cameras to Android. Using it, you can connect most IP cameras that have a WiFi access point to an Android gadget.
Hello, thank you for reading the article.
Question, can I connect any, roughly speaking, inexpensive IP camera to the laptop by “doing magic” with the IP address?
p.s. I need to shoot a video in the dark using a camera with IR illumination. For these purposes, will it be enough for me: an IP camera, software, a laptop?
Thank you
A disadvantage of the camera is the lack of a port for a memory card: it is installed on the motherboard, which requires partial disassembly of the device.
Ready-made sets of video surveillance systems
Several cameras will definitely be required to monitor a large area or ensure the security of a complex building.
A smart choice for solving this problem is the AliExpress video surveillance system. On the trading platform it is easy to find an offer with the required number of cameras, with or without a DVR.
H.VIEW 104AM+10X5AMC4
The system includes 4 analog cameras and a hybrid video recorder, to which you can connect digital monitoring devices.

The equipment set is designed for universal use, inside and outside the building, and offers many possibilities.
Characteristics:
- powerful IR illumination of cameras (24 diodes);
- hybrid video recorder;
- 720p class cameras;
- built-in motion detectors;
- protection from moisture;
- simple mechanics of copying a video archive, saving it to external media or memory cards;
- built-in access control system via the Internet, from a local network;
- convenient shell for working with cameras.
The cameras are designed for wall mounting; the system as a whole is characterized by quick deployment and easy configuration.
Specialized software is offered for accessing broadcasts via the Internet or local network.
ZOSI 8KN/8KM-106B4-00
An excellent purchase option for those who initially expect to expand their video surveillance capabilities.

The equipment set offers:
- 4 AHD 720p analog cameras, 1/4 Aptima CMOS sensor;
- built-in IR illumination;
- hybrid DVR, with support for disks up to 6 TB, three ports for connecting external media;
- built-in motion detectors and warning system;
- convenient software for remote access via smartphone, PC;
- access control system;
- The temperature range of the cameras is from -10 to 55 degrees Celsius.
A special feature of the system is the possibility of easy expansion. The hybrid DVR can work with all types of cameras, analog and digital. The set includes 4 monitoring devices, and there are 8 recorder ports available.
Techage Plug and Play 4CH Wireless NVR Kit P2P 720P HD
This system will not force you to fuss with laying cables. The connection between the cameras and the DVR is wireless.

Characteristics:
- cameras with 1 MP optical sensor, CCTV 720p standard;
- water protection class IЗ66;
- built-in motion detectors, alert system with sending email messages;
- powerful IR illumination (30 diodes) for night photography;
- specialized software for remote viewing of broadcasts;
- easy setup and installation;
- 4 port hybrid DVR;
- the ability to order a built-in 1 GB disk;
- access control system from a local network or the Internet.
A special feature of this set of equipment is not only its ease of deployment (external antennas of the fixation devices and the video recorder guarantee a stable channel over a long distance), but also its impressive durability.
Thus, the cameras are designed for operation at temperatures from -20 to 55 degrees and are characterized by a service life of 5 years.
Conclusion
To find something, you need to start looking. This saying fully applies to cameras and video surveillance systems presented on the Aliexpress trading platform.
There is literally anything here. You can even find devices with an unexpected set of functional features.
But the main thing is that all the products presented are of good quality, reasonable price and technological excellence.
Therefore, if you want to solve video surveillance problems with minimal investment, you should pay attention to Aliexpress’s offers.
Video: Video surveillance from Aliexpress for 7300 rubles. Expert opinion
On the day of Black Friday sales, November 25, 2011, among other things, I bought two IP video cameras for $25. Now such a camera costs about $45.
The camera allows you to view and record video with a resolution of 640x480 pixels, it can rotate up and down and in a circle almost 180 degrees. There is switchable infrared illumination, sound transmission and a built-in speaker.
The camera connects to the local network and is powered by 5 volts from the included adapter.

The adapter plug is Chinese, so you will need an adapter.

Video viewing and camera control occurs via the web interface, and there are three options:
1. Mobile interface. The simplest and most convenient to view.

In this interface, you can move the camera, set the camera in one of five pre-configured positions (presets), and allow or disable the backlight to turn on when the light level decreases.
2. Advanced interface. Allows you to configure camera settings.

3. ActiveX interface (works only in Internet Explorer).

In addition to all of the above, it allows you to record video from the camera with sound, as well as transmit sound to the camera (it becomes another sound card in the system).
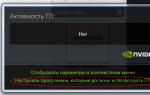
Camera system parameters are configured in a separate screen.

By default, the camera has the address 192.168.1.99:99. It is pre-registered on the 88safe.com DDNS service. There is a sticker with the DDNS name and password on the bottom of the camera. Moreover, the camera can work with several DDNS services, including dyndns.com. This allows you to access the camera via the Internet.
The Internet connection must have a real IP address, and if it is also static, DDNS will not be needed. In order to see the camera behind the router from the Internet, you need to configure port forwarding on the router. For example, you can specify that port 8009 is forwarded to the address 192.168.1.99 and port 99. In this case, to access the camera via the Internet, you will need to go to the router address indicating port 8009 if the address is static or to the address given by the DDNS server and port 8009 , if the address is dynamic.
In addition to viewing through a browser, the camera can send frames by e-mail or ftp based on the movement of the object. In addition, the camera can send frames to FTP once every specified number of seconds. It was this opportunity that was used for bird broadcasting. Each frame has a unique and unpredictable name, consisting of the camera name, date and time of the photo.
In order for these frames to be used, one of my blog readers wrote a script that renames the newest frame, deletes all old frames and updates the picture every five seconds.
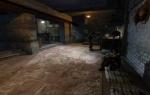
The camera sees perfectly in the IR range. Apparently this is why the bright green foliage of trees turns out purple - it reflects IR well.
Here's a shot taken in complete darkness with the IR illuminator turned on.

A fragment of video recorded by this camera.
I did not regret spending fifty dollars - the cameras came in very handy when I found a wagtail nest on the balcony and I think they will come in handy again.
Upd: Instructions in PDF.
Digital cameras are rapidly taking over the field of video surveillance, displacing already outdated analog systems. There are many positive aspects in such a revolution, because digital television has many advantages that are not characteristic of analogue television. However, as many believe, a significant drawback of new technologies is their price...
Fortunately, developers from China, as always, help out in this matter and supply the market with technologies that are relatively cheap and also have quite rich functionality and characteristics. Of course, the quality of the product and filming of Chinese IP cameras is incommensurate with the performance of products from famous brands, but such devices are quite capable of performing the required tasks at their price level.
Now for around $50-100 you can purchase a model of a Chinese IP video camera, which is equipped with a rotating mechanism, wireless network support, a camera that shoots in VGA format and H.264 compression, a memory card slot, IR illumination, and a motion sensor , microphone, speaker, as well as other features that are necessary for an IP camera.
But the main difficulty that owners of such devices face is setting them up, because often the software and instruction manuals are supplied in the native language of the developers, and this already causes a lot of inconvenience.
 Having connected the Chinese IP video camera to a computer or router, the red or green light above the network connector should light up, after which the first problem with the setup immediately arises: the camera is assigned a non-standard IP address.
Often, this network address can be indicated on the box or CD. The network connection settings on the computer must be set to automatically obtain the address and network mask.
Among other utilities on the disk, there should be a program called “IPCamera” or “IPCamTool”, which the antivirus can mistake for a malicious object, so you should disable its scanning. After launching the utility, a window will appear in which the connected Chinese IP camera should appear. But if you click the “OpenDevice” button in the settings menu, no action occurs.
 This can be corrected by assigning a static IP address to the network connection of the video camera; in some cases, it is necessary to change the last digit by 1 or 2 values.
Having gained access to the video camera using the standard login and password (admin), you can make some changes to the camera’s network connection settings, see the video signal being captured, view the archive of recordings and gain access to the shooting settings.
As you can see, the settings of Chinese IP video cameras can be completely unpredictable, and even similar models can have different configuration nuances.
Head of the technical support group Benedikt Maksimenko.
IP camera- a useful device for any home or apartment. With it, you can monitor property (with a permanent record of what is happening), monitor the behavior of children or animals, or use it for entertainment. For example, everyone has encountered a situation when they left for work, but do not remember whether they turned off the iron or whether they closed the front door. In such a situation, you can go home and check, you can worry all day... or just look at the home camera and make sure everything is fine.
The most convenient camera for home should be able to rotate the lens in any direction (ideally 360 degrees and up and down), transmit images via Wi-Fi (for easy installation anywhere) and work stably. In addition, modern home IP cameras have special applications for Android and iPhone; you can connect to them from anywhere without using a computer.
Why you shouldn't buy an IP camera in Russia
Home IP camera from China
Of course, buying an unknown model is always a risk. I took such a risk consciously and was not mistaken, and now I will share this experience with you. Now I already have 3 such cameras, they all work stably and perform their main functions.

This IP camera is produced in China under several brands, so the easiest way to find it is by appearance. Regardless of the brand name, the camera will be the same. You can buy it from this seller, or find it cheaper from any other. Please note that this seller's price is slightly higher, but delivery is from a warehouse in Russia. If you choose delivery from Russia, you will not have to wait several weeks for a package from China.
Main features of this IP camera:
- Shooting quality - up to 720P (HD);
- Remote control, the lens can be directed in any direction (360 degrees) and up and down;
- Full night shooting (infrared illumination);
- View the camera from any browser, Android phone or iPhone;
- Android application with two-way voice communication;
- Ability to send photos by email when a motion sensor is triggered;
- Setting up a scheduled security mode;
- Connect to a Wi-Fi network or cable;
- Supports various protocols, the camera can be connected to any video surveillance system.

 link .
If you have any questions or need clarification, leave a comment and I will definitely help!
Good luck!